
Converting USA Dates to UK Dates

Usually Excel date values don't cause any problems, you type them in with slash or dash separators and don't bother about the year value unless your date is for a year other than the current year. Excel automatically enters the current calendar year if you just give day and month values.
 |
| Excel Date Converter |
But you will have a problem if the country setting on your system has not been set correctly. Excel was written in the USA and uses their Month-Day-Year date convention so you will have to change it if you want to use the UK convention of Day-Month-Year.
The United States Declaration of Independence is clearly dated "July 4 1776" and there's little chance of their changing to suit us. You can't argue with the Founding Fathers.
The country setting issue is easily resolved, the real date problem arises when you have to share documents with your friends and colleagues from across the pond. Your opposite number in New York emails you data that was quite sensible when it was entered but when you open the document the dates go haywire.
 |
| Happy dates! |
You can Google formulas that will reverse the date evaluation for you but they are awkward to implement if you have to do this sort of thing regularly. In this article we are going to create a Date Converter that reverses the day and month values of any date directly in the cell without having to use formulas. The converter uses an Excel macro which is triggered when you click a shortcut button on your Quick Access Toolbar (QAT).
Converting UK Dates to USA Dates

It also works the other way round. So, if someone from the London office sends you a spreadsheet and the dates are entered in good-old-King-George Day-Month order you select your cells, click your shortcut and it whizzes the date evaluation around into nice, sensible Month-Day dates.
Making the Date Converter macro
There's ten steps to go through here but don't let that put you off as they are very simple and the entire process will only take a few minutes. If you're not familiar with the term "macro" then allow me to explain. Macro is short for macro-instruction and is a sequence of instructions written in Excel's scripting language, VBA (Visual Basic for Applications)
Step 1. Recording a macro
 |
| Turning on the recorder |
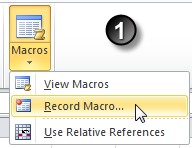
Go to the Macros control which is found on the extreme right-hand side of the View tab on the Excel ribbon. Click the bottom section of the control and choose Record Macro from the menu.
Step 2. Using the Personal Macro Workbook
 |
| Recording a macro |
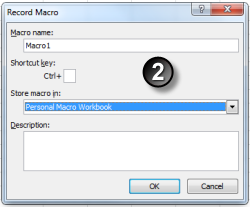
When the dialog is displayed, change the Store macro in setting to Personal Macro Workbook. It's available in the drop down list. Don't bother with anything else. Click OK to start the recorder.
Whatever you do now gets recorded but there's no need to do anything. Just turn off the recorder and this step is completed. Click Stop Recording in the menu on the Macros control.
Step 3. Finding the recorded macro
 |
| Project Explorer Window |
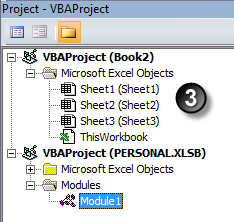
This is done in the Visual Basic Editor. Press ALT+F11 to open the editor and then see if you can spot a window in the top left-hand corner which looks like this illustration. That's the Project Explorer window. If you can't see it, press Ctrl+R.
Look in the listing under PERSONAL.XLSB, you may have to click the plus sign nodes to open up the listing. If you've never used the Personal Macro Workbook before you will need Module1. If there are a set of modules visible then you need the last one. Double-click the module and you will display the code of your recording in the window on the right-hand side of the screen.
Step 4. Copying and Pasting the code for the macro
 |
| The recorded code |
Select all your code from the word Sub to the words End Sub and press the DELETE key.
Then copy and paste the code from the section below to replace the original.
This is the code for the date macro:
Make sure that you copy and paste everything, starting with the word Public and ending with words End Sub. When you've pasted the code you will see that some of the words will turn a blue colour and some green. That's exactly what they should do.
Then copy and paste the code from the section below to replace the original.
This is the code for the date macro:
Public Sub DateConverter()
Dim rngCells As Range
Dim rngCell As Range
Dim strMsg As String
Dim intDay As Integer
Dim intMonth As Integer
Dim intYear As Integer
Dim DateValue As Date
On Error Resume Next
strMsg = "Select the cells to convert:" & _
vbCr & vbCr & "Reverses Month and Day date evaluation," _
& vbCr & "i.e. MM-DD becomes DD-MM if possible."
'Receive the input.
Set rngCells = Application.InputBox(strMsg, "Date Converter", , , , , , 8)
'Test for no input received.
If Not IsObject(rngCells) Or rngCells Is Nothing Then
GoTo Exit_DateConverter
End If
'Date Conversion Loop.
For Each rngCell In rngCells
If IsDate(rngCell) Then
intDay = Day(rngCell)
intMonth = Month(rngCell)
intYear = Year(rngCell)
DateValue = intMonth & "/" & intDay & "/" & intYear
rngCell.Value = DateValue
End If
Next
Exit_DateConverter:
End Sub
Make sure that you copy and paste everything, starting with the word Public and ending with words End Sub. When you've pasted the code you will see that some of the words will turn a blue colour and some green. That's exactly what they should do.
Step 5. Saving the macro
 |
| Don't forget to save! |
The macro is completed and we now get back to Excel by pressing ALT+F11 again. Or you can close the Visual Basic Editor window.
Step 6. Creating a shortcut for the macro
 |
| Customize the QAT |
The most obvious place to have this is on your Quick Access Toolbar. Point to the QAT (top left-hand corner of the Excel window), right-click and choose Customize Quick Access Toolbar from the shortcut menu.
Step 7. Customizing the Quick Access Toolbar
 |
| Choose from the Macros category |
Working from the top left-hand corner of the section, click the Choose commands from drop-down list.
Then click Macros in the list.
Step 8. Assigning the macro to the QAT
 |
| Adding your macro to the QAT |
Your macro now appears in the right-hand list which shows you all the shortcuts available on your Quick Access Toolbar.
The next step is cosmetic and will make your shortcut button more visually attractive. Click OK now if you want to skip this final step.
Step 9. Modify the macro button
 |
| Assigning an icon to your macro |
There's an array of different icon images to choose from. Enter some text into the Display Name box to set the Screen-Tip text.
You don't have to enter "Date Converter", you can enter anything you like. Click OK to close the dialog and OK again to close the main Options dialog.
Step 10. Test the macro
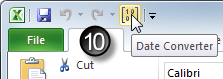 |
| The Date Converter shortcut |
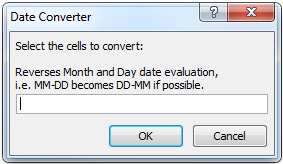 |
| Date Converter Input Box |
Any requests
Leave a comment if you found this Step-by-Step useful and I'll post some more. I have loads of Excel macros in my box of tricks, mainly things that I have found really handy over the years. Like, for example, password protecting all the worksheets in the workbook, protecting all the formulas in a worksheet, listing all the validation formulas used etc. Or anything else you can think of...Happy clicking!
This is a fabulous macro - I've been looking for something like this for years. Massive thanks.
ReplyDeleteagree its superb, one thing though ;-) what about if you have HHMMSS and want to retain that? in the new date e,g 05/01/2014 12:20:21 become 01/05/2014 12:20:21
ReplyDeleteTo preserve your times, read them from the cell as you read the date values and then put them back when you reconstruct the date values. You need one extra line in the code and then a small change to an existing line, change the interior of the Date Conversion Loop as follows:
DeleteIf IsDate(rngCell) Then
intDay = Day(rngCell)
intMonth = Month(rngCell)
intYear = Year(rngCell)
myTimeValue = TimeValue(rngCell)
DateValue = intMonth & "/" & intDay & "/" & intYear & " " & myTimeValue
rngCell.Value = DateValue
End If
Brilliant- thank you!
ReplyDeleteThis page is very informative and fun to read. I appreciated what you have done here. I enjoyed every little bit part of it.
ReplyDeleteImage Icon Converter
This page was very helpful. Many thanks. Mark from London
ReplyDeleteGreat find - works brilliantly, thank you.
ReplyDeleteOutstanding. Just what I wanted and easy to implement. Thanks very much Steve.
ReplyDeleteHi Steve, Followed your instructions to the letter but it comes back with "compile error and syntax error" when i run the macro. I'm using excel 2013. Is that a problem?
ReplyDeleteSteve, Correction to my previous post. When i cut and paste it added a blank line which VB didn't like. It works a treat.
ReplyDeletePhew! I'm glad to hear that. You nearly gave me a nasty turn there. All the best.
DeleteThank you, you saved my life!
ReplyDeleteI have been looking so long for this. Always doing it manually as any macro that I wrote or found on the internet never worked. I use this everyday as I always get reports with dates from different locations.
I just added
Selection.NumberFormat = "d-mmm-yy"
to mine, so that around the globe there can be no misunderstanding of the date.
Great post! Was looking! Integrated your algorythm into my userform macro to prevent the need to ever do this!
ReplyDeleteThank you so much! This is amazing!
ReplyDeleteThank you so much for this it works great. Is there a way though of preselecting a column?
ReplyDeleteI think that the easiest way to do that is to run the macro on your current selection. Leave out the input box and the validation and go straight into the data conversion loop.
DeleteDelete all the code after, "On Error Resume Next" up to the comment "Data conversion loop" and then change the first line of the For Each loop to read as follows:
For Each rngCell In Selection