 |
| Space Invaders! |
Space invaders—they’re out there. They’re everywhere, so many people who spent their tender youth learning to touch type seem to have the dreadful habit of entering a space character after every word they type.
I suppose it's understandable, whenever they type in a word their thumb hits the space bar because you need a space between each word in a sentence.
The trouble is they bring this habit with them when they type individual words into Excel cells. They don't mean to but they do. Bang goes that spacebar again and there you are with a space on the end of every single word. The Space Invaders strike again and it's Game Over for your formulas.
Space Invaders
Your text is corrupted, you can’t see the space so you don’t know it’s there and you go crazy every time you use one of Excel’s functions which relies upon simple text matching to work properly. And it's usually the last thing you think about, all you know is that your formulas don't work! It's usually formulas that use one of those incredibly useful functions like SUMIFS, COUNTIFS and VLOOKUP. Now, who in their right mind would want to use those? Well, just about everyone.
Consider the bitter tears of wrath that have been spilt over such an innocent thing as a space character. It's usually "Boo-Hoo-Hoo, why isn’t my formula working?" Then, after half an hour of head scratching, it's.."Duh, it's got a space on the end." Been there?
Database data
The other explanation for the dreaded spaces is that your Excel data has been retrieved from a database file and the original table data has a fixed length field. Unless someone has remembered to clean up the data when it is extracted you can end up with the actual data you can see plus the padding of space characters that you can't see. A typical fixed length field for text data is 50 characters.Trim function
Once you realise that the space characters are there (and that is the difficult bit) then you can easily remove them using Excel's TRIM function which trims off the space characters before the first and after the last visible character. The leading and the trailing spaces are removed but any spaces in the body of the text, the medial spaces, are preserved. But you can't clean up your data in situ, you have to enter a formula into another cell and then Copy and Paste As Values to replace the original dirty data with your clean data. It works but it takes a few steps and it's painful if you have to do this kind of thing on a regular basis. Maybe there's a better way?Macro to remove spaces from all text cells in a worksheet
Try using my macro, it takes no time at all and trims the spaces in all your text in the entire worksheet. You don't need to know the first thing about macros to get it working. If you can copy and paste then it's yours. This is what you need to do:
Click View tab, Macros and Record Macro. Don't worry about the Macro name or anything else apart from the Store macro in setting which should be Personal Macro Workbook which you can choose from the drop down list.
Click OK to start the recording and then click Stop Recording from the Macros control. You now have your module.
Press ALT+F11 to switch over to the Visual Basic Editor, then look at the top left hand corner of the editor window and see if you can spot the Project Explorer window. Press CTRL+R if you can't see it. Look for PERSONAL.XLSB in the listing and keep clicking the plus signs until you can see the modules in your Modules folder. Double-click on Module 1 to open it. If you have more than one of them (you've already been using your Personal Macro workbook) then double-click the one with the highest number. Select your recorded macro and Paste over it.
This is what your macro should look like. Notice how some of the words turn blue:
Our macro is ready to go now so open the workbook file where you want to clean up all the text and then click View tab, Macros, View Macros. Choose PERSONAL.XLSB!Trimmer from the list and then click Run. Voila and Hey Presto! Quick as a flash your text is cleaned. Where did all those spaces go?
Your Personal Macro Workbook opens up automatically every time you start Excel so once you've saved it you can use it anytime you like. The Personal Macro workbook is a hidden workbook that's used to store handy macros that you would want to use on a regular basis, it's always open but it's not visible.
- Create a module in your Personal Macro workbook where the macro will be stored.
- Copy and Paste the macro code into your module.
- Save your Personal Macro workbook.
- Run the macro.
Step By Step
Create a module in your Personal Macro workbook
Turn on the macro recorder and record into your Personal Macro workbook. It doesn't matter what you record because we are going to replace the recording with our own code in a moment but you need to have a module (a storage area for macros):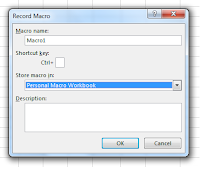 |
| Recording into Personal |
Click OK to start the recording and then click Stop Recording from the Macros control. You now have your module.
Copy and Paste the macro code into your module
Select all the text from the section below and copy it (all the text starting with and including the word Sub down to and including the last line, End Sub) Now we need to switch over to your module and paste the code.
This is the code to copy and paste:
Sub Trimmer()
Dim rngText As Range
Dim rngItem As Range
On Error Resume Next
Set rngText = Cells.SpecialCells(xlCellTypeConstants, 2)
For Each rngItem In rngText
rngItem.Value = Trim(rngItem.Value)
Next
End Sub
Press ALT+F11 to switch over to the Visual Basic Editor, then look at the top left hand corner of the editor window and see if you can spot the Project Explorer window. Press CTRL+R if you can't see it. Look for PERSONAL.XLSB in the listing and keep clicking the plus signs until you can see the modules in your Modules folder. Double-click on Module 1 to open it. If you have more than one of them (you've already been using your Personal Macro workbook) then double-click the one with the highest number. Select your recorded macro and Paste over it.
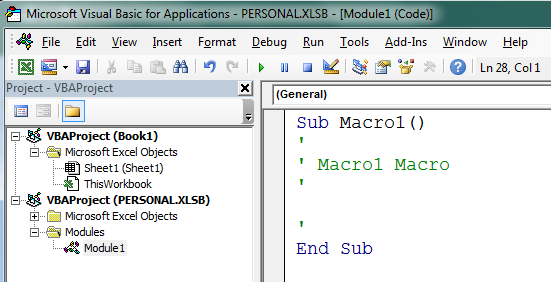 |
| The Recorded macro viewed in the Visual Basic Editor |
This is what your macro should look like. Notice how some of the words turn blue:
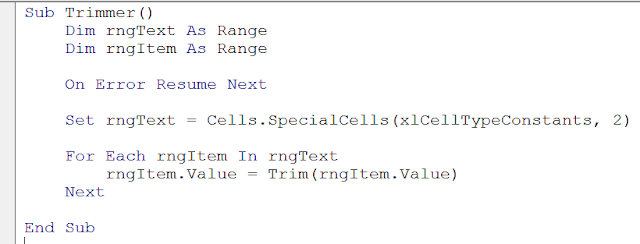 |
| Macro pasted into the module |
Save your Personal Macro workbook
Do this while you are in the Visual Basic Editor as it's tricky to do back in Excel. Click File, Save in the main menu. Press ALT+F11 to exit the editor and return to Excel.Run the macro
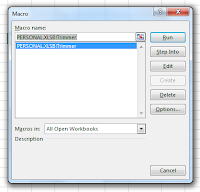 |
| Run the macro |
Your Personal Macro Workbook opens up automatically every time you start Excel so once you've saved it you can use it anytime you like. The Personal Macro workbook is a hidden workbook that's used to store handy macros that you would want to use on a regular basis, it's always open but it's not visible.
Commentary of the macro code
If you know all about macros then you can just copy the code and use it. If you want to analyse it then here's the explanation:
Firstly, we declare two object variables of class Range; rngText which is a collection of all the text cells in the active worksheet and rngItem, which is each individual text cell—each member of the collection.
Dim rngItem As Range
Then we initialise rngText using the Set keyword and loop through the collection with a For Each loop returning the cleaned text into each cell using the VBA Trim function.
Set rngText = Cells.SpecialCells(xlCellTypeConstants, 2)
For Each rngItem In rngText
rngItem.Value = Trim(rngItem.Value)
Next

No comments:
Post a Comment