Filter Design Explained
 |
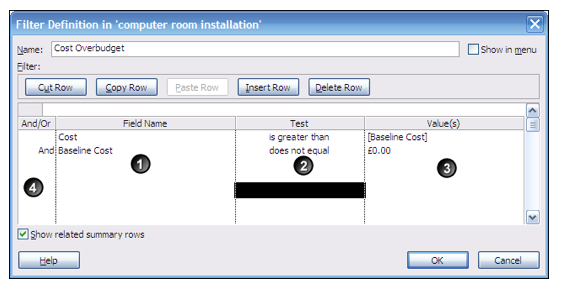
The different parts of a filter are:
1. Field Name – this is field that needs to be analysed
when deciding which
tasks need to be selected.
2.
Test –the test that needs to be
applied to the field.
3.
Value – the comparison value
against which the test needs to be applied.
4. And / Or – If there is more than one comparison that needs
to be made, what logical factor
needs to made.
In the example above the filter definition tells us
that this filter is made up as:
• The current cost value is larger than the baseline cost
• And
• Baseline Cost does not equal £0.00 (nothing).
This filter will find all the tasks that now cost
more than original cost, as long as the baseline as been set.
The second row is necessary, otherwise everything
would be over budget if no baseline is set.
Creating a new
filter
A new filter can be created by:
1. Project Menu,
2. Filtered for
3.
More Filters
4.
Click on the
New button on the right hand side of the dialog box This brings up a blank filter definition.
 |
To set up a new filter
1. Give the filter a relevant name
2. Decide whether it is to be used regularly. Tick the Show in menu box if necessary.
3.
Choose the field that is going
to be used to select the tasks.
4. Select the appropriate test from the drop down list.
5.
Enter the value
to be tested against. (This can be another field, an exact value or a
parameter.)
6.
Repeat steps 3 to 5 if more that one comparison is to be made, remember
to select the And / Or to
define how the different criteria are to interact.
7.
Click OK to go back to the previous
screen where the new filter
can now be applied or
highlighted.

No comments:
Post a Comment