
Terminology
Project management has several terms
that are related to the subject that are key in understanding the results from
Microsoft Project.
It would be very difficult realizing the
full benefits of the Microsoft Project without understanding them.
What is the Critical Path?
Microsoft Project
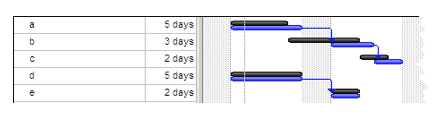
allows you to plan when the tasks (steps) are going to happen and display
a sequence of them in a Gantt Chart. As default all the tasks are shown in the
same colour (blue).
By showing the project plan in this way
it does not display which tasks if they are delayed are going to impact on the
finish date.
 |
The Critical Path is the sequence of
tasks that if they are delayed or take longer than planned are going to impact
on the finish date of the project plan. These tasks are not necessarily the
most important tasks in the project plan – just the ones that are going to
setback the finish date.
Microsoft Project allows the Gantt Chart
to display them formatted in a different way, and so display the critical path
in a different way.

It is important to know which tasks are on the
critical path so that if tasks need to be postponed for any reason, it is not
the tasks that are going to impede the end of the project that are chosen.
What is the
Baseline?
The baseline is the original plan of when the tasks
are going to take place as agreed by the stakeholders.
It holds data on when the tasks are going to take
place, how long they are going to take, how much work is involved and at what
cost.
 |
The baseline can be displayed against
the current plan, either by showing all the tasks in the same way or also by
showing which tasks are currently critical.
 |
The advantages of using a Baseline
By having this information, when the project actually
starts (or changes are considered), comparisons can be made between what is
happening now and what was originally agreed.
Once the project is finished, the project plan can
be analysed. This will then help improve future plans, as it will be possible
to see which areas of the plan worked as scheduled and which areas didn’t.
Hopefully reasons can be given as to which areas didn’t work as they should.
Once the guide is displayed, there are
two parts.
1.
The toolbar –
where you can choose what stage you are in the process.
2.
The guide –
which lists what needs to be done.
Notice the first two steps given in the
guide

The guide is not displayed as standard
in Project 2007, and should you wish to use it, it needs to be turned on.
To turn on the guide
1. Menu, Tools, Options
2.
Click on the interface tab
3. Select Display Project Guide in the Project Guide Settings
4. Accept changes by clicking on OK.

This turns on the project guide for all project
plans until you go through and turn the guide off.
No comments:
Post a Comment