
Set the calendars
When you first start using Microsoft
Project the default settings on the software are an eight hour day and a forty
hour week.
If you do not need to resource cost the
project or exact working times for the project plan, then whether you plan on a
forty hour week or a thirty seven and a half (or any other value) doesn’t
really matter as the information required is on dates. In which case you do not
need to worry about the exact hours on a day by day basis and you will only
need to add the non working days ie the bank holidays.
If you do need to resource cost the
project plan or need exact hours to be worked on each task then it is very
important that the calendar reflects accurately the hours scheduled to be worked.
To make changes to the standard calendar for the
project plan:
•
Menu, Tools, Change Working Time
 |
At the top, make sure the calendar that
needs to be changed is selected. As default the calendar that is selected in
the project information is the one that is displayed automatically.
Bank Holidays or Non Working Days
To enter non working days into the calendar
1.
Select the Exceptions tab on the
Change Working Time Dialog box.
2.
Click on the date of the non
working day
3.
On the exceptions tab type in the name of the non working day, such as New years day.
Repeat steps 2 and 3 as necessary to enter all of
the non working days.
Should there by a situation where for a particular
day there are different working times, depending on the working environment
there might be a half day for Christmas Eve or Maundy Thursday, then that can
be accommodated in the exceptions as well.
1. Enter the day as a non working day
2. Move off the cell, (Otherwise Details will not be available.)
3.
Make sure the cellpointer is on
the correct row for the day required
4.
Click on Details
 |
5.
Select Working Times
6.
Either change
the Working Times as necessary or highlight the row to delete the times. If the
top row is deleted it will automatically move the row below up. (This used to
have to be done manually in earlier versions of Project.)
7.
Click OK to return to the previous screen.
Change the Size of the Working Day
If the size of the working day and week
need to be changed, then this can be done on the Work Weeks tab in the Change
Working Time Dialog box.
1. Click on the Work Weeks tab
2. Select [Default]
3. Click on Details
 |
4.
Highlight the days to be changed
by clicking on the first one, holding
down the shift key and clicking on the last one.
5.
Change the setting on the top
left to specific working times
6. Change the hours.
7.
Move off the
cells changed (if you don’t move off the last cell changed, then that change will not be made, even
though the other ones will)
8.
Click on OK
This changes the hours to which any
tasks will be applied. It does not change the size of the day that is used to
calculated the duration of the task. It is very important that the two
correspond correctly otherwise the software will not plan the tasks correctly.
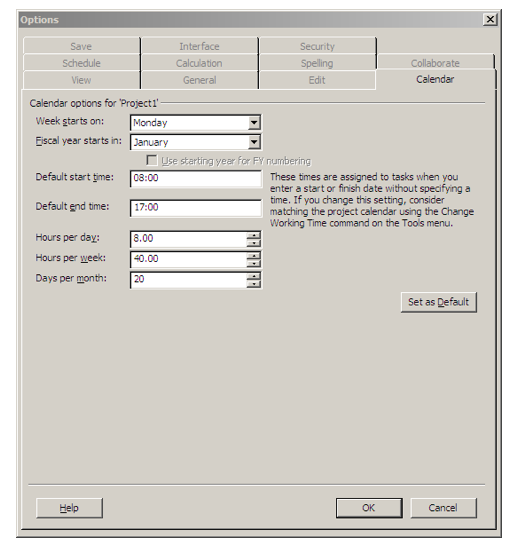
To change the size of the working day can be done
via the
•
Menu, Change
Working Time, Click on the OPTIONS button
or
• Menu, Tools Options and the Calendar Tab.
Both options take you to the same
screen, where you need to enter values so that they match the settings that
have been entered on the Change Working Time.
This should only be done for the calendar that is
the default calendar for the project.
 |
No comments:
Post a Comment