Opening an existing Database
If Access has just been opened or there is no database already open then you can open an existing database from the Getting Started page.
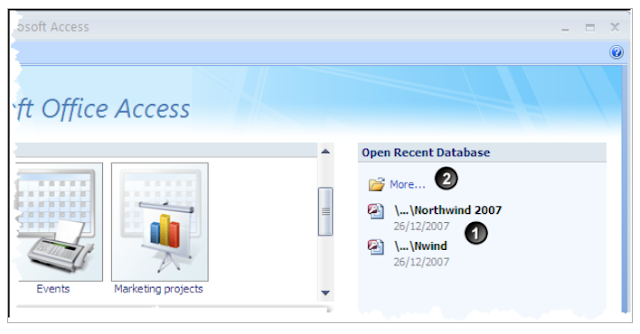
A database can be opened in one of two ways from this dialog box.
1. If the database has been viewed recently then the name will be listed in the “Open Recent Database” list. Click on the requisite database.
2. If the database that you require has not been used recently then you need to click on the “More” folder. This will take you to the Open dialog box.
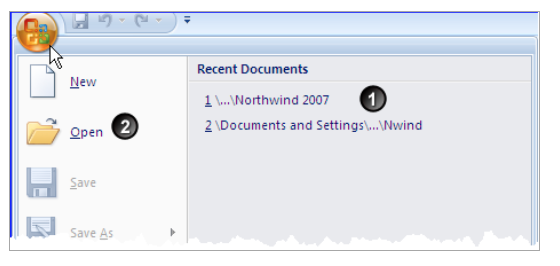
If a database is already open then a database then the menu system has to be used. Click on the Office button, from the menu you have the same two options as above.
Navigating Access
Once a database is opened, the Navigation Pane is used to access all the objects in the database.
The different functions of the navigation pane are:
1. Navigation Pane Menu allows you to choose how the database objects are shown in the Navigation Bar.
2. The Shutter Bar lets you show or hide the Navigation Bar.
3. The groups of objects.
4. The objects in the selected group.

The Navigation Pane Menu
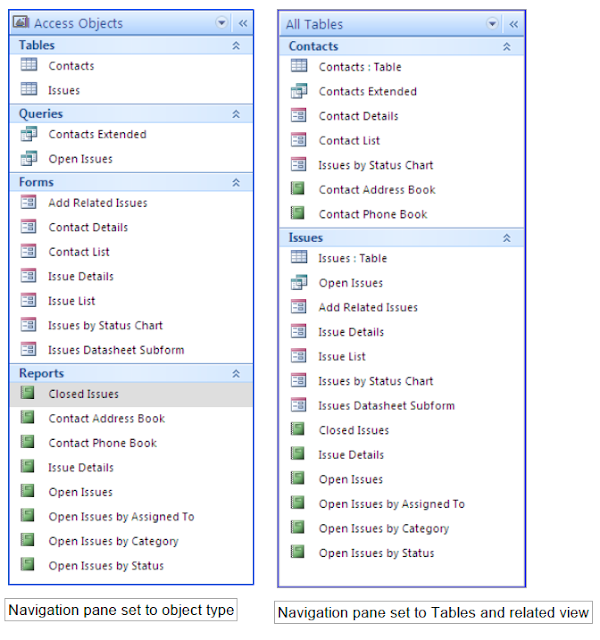
1. The navigation Pane Menu allows you to choose how the objects are shown in the Navigation pane.The default category on creating a new database is “Tables and Related Views”.
If you are opening a database that was created in an earlier database the default type is Object Type.
This is the option nearest to the Database Window that was used in earlier versions of Access.
2. Filter by Group allows you to choose whether all the objects are shown or a particular group of them.
The group name will only appear if objects of that type actually exist in the database.
The Shutter Pane shows or collapses the navigation pane. When the navigation pane is showing it takes up space that you might want to use to view your objects – hence the facility to collapse it to a side bar.
To take off the navigation pane completely has to be done via the Access Options.

The groups that are visible depend on the options chosen from the navigation pane menu. Using the default settings only the groups where objects exist are listed.
To show or hide the objects in a group all you need to do is click on the group name.
Navigation Pane Settings
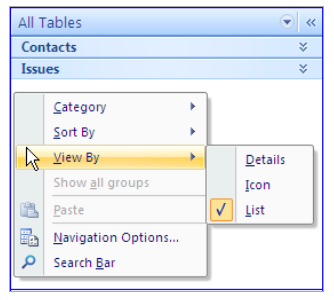
A search bar can be added onto the navigation pane, the order in which the objects are listed and how they are displayed can all be changed. The display options will depend on how you detailed you want the list to be.They can be changed by right clicking on the Navigation Pane Menu or by right clicking on the blank area at the bottom of the Navigation Pane
The Navigation Pane Options can be changed if none of the categories meet your requirements totally. If necessary, a new category can be set up with your required groups.

1. Click on the Add Item.
2. Change the name of the added item to what you require.
3. Groups within the category can be added by clicking on Add Group.
4. Change the name as required.
Repeat 3 and 4 as many times as necessary to add the required number of groups.
Opening an existing Table
If you need to see data that has already been entered, or to add to or to amend the data then the data must be accessed. This can be done in several different ways, but the simplest method is via the table where it is stored. (This is not necessarily the most user friendly).To open a table
1. go to the navigation pane.
2. Open the group with the table to be opened.
3. Double click on the table name.
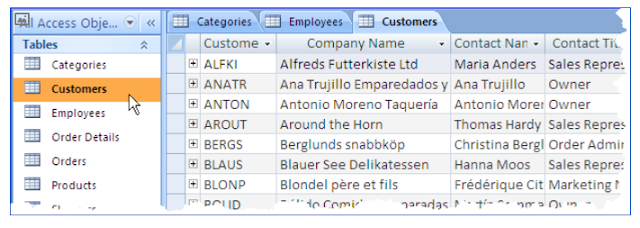
Any open tables are shown with the tabs showing, and can be activated by clicking on the tab across the top.
You can open as many tables as you want to – the likelihood of reaching the limit is very slim. The maximum number of tables that can be opened at any one time is 2048. (Though that number does include the system tables that are hidden and not normally seen, explicitly used or changed by the user).
Navigating in a table
To be able to add, edit or delete a record you must first be able to select the appropriate record. This can be done using the navigation bar at the bottom of the window.
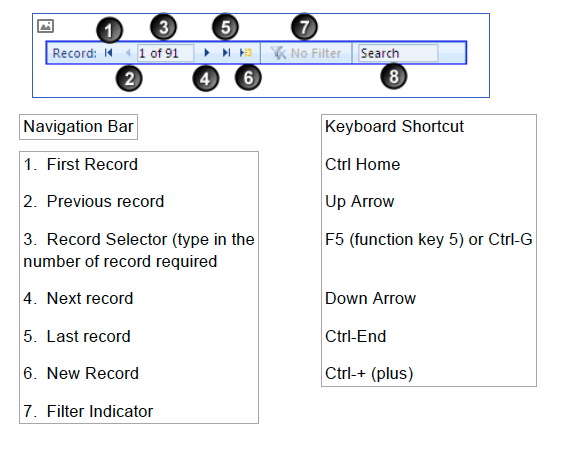
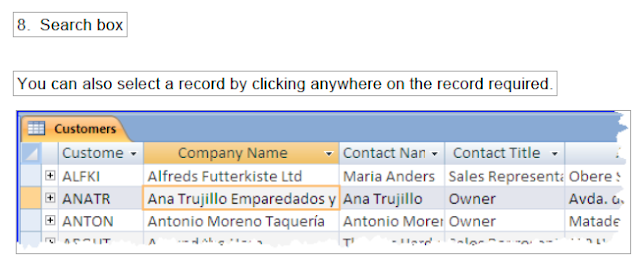
The selected record indicator is the orange box on the left of the row.
Adding a new record
A new record can be added by clicking on the new button on the navigation bar or by clicking on the new button on the Home Ribbon.

This positions the cursor onto a blank record at the bottom of the table. The new record is shown by the asterisk in the indicators column. When new data is added the indicator changes to a pencil. The pencil shows that there is some data that has not been saved and so could be lost

When the record has been completed, you must move off the record by either tabbing off the record or by clicking onto another record. By moving off the record, the data is saved. The pencil changes to an asterisk so that you are ready to add another record.
Data is saved automatically in Microsoft Access by moving off the record – it differs from the other Microsoft packages, you do not have to click on the save button. (But you can save the record by clicking on the Save Button or by Shift-Enter to save the record without moving off the record).

Changes to the current field can be abandoned by using the Esc key once. So the contact name of Fred Bloggs would be removed. Changes to the current record can be abandoned by using ESC twice. This would remove the Customer id, company name and contact name.
If a record has been saved, then as long as nothing else has been done then the record can be removed by using the UNDO facility, either by clicking on the undo button on the Quick Access Toolbar, or by using the shortcut key combination of Ctrl-Z. A warning will be given that you are about to delete a record.
In the above example, the BOOMI record has been saved and the BLOGG record has been abandoned. Even though BOOMI is showing at the bottom of the table, once the table has been closed and then reopened the record will then rearrange into the correct order.

No comments:
Post a Comment