Creating Tables
Tables allow you to arrange the data in a table, similar to a spreadsheet where you can define the number of rows and columns. The table can be formatted or not as required.Inserting a table
Tables can be inserted by using the table button on the Insert Ribbon

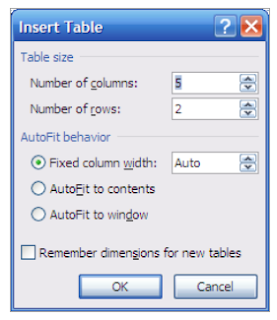
This then allows you to define the size and the behaviour of the table
The important setting here is the number of columns, extra rows can be automatically added to.

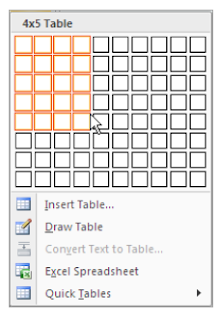
To insert a table where there is automatically a border on the cells for the table,
Click on the arrow at the bottom of insert table button.
Define the size of the table by highlighting the range required.

Contextual Ribbons
Once a table has been created, then it can be customised as necessary.
This can be done by using the secondary mouse button and calling up the shortcut menus, using the normal ribbons or depending on the type of customisation required by using the contextual ribbons.
Tables have two contextual ribbons:
Design

Layout

Selecting within a table
Diagonal black arrow : Selects individual cells
Diagonal outlined arrow : Selects rows within tables
Vertical black arrow : Selects columns within tables
Four headed arrow : Positioned to the top left of the table, it selects the whole table
Multiple items can be selected by dragging with the appropriate symbol.

No comments:
Post a Comment