Journal Explained
Like the internet history keeps a track on what websites we visit, we can now track what we do on our computer.Have you ever saved a file and forgotten the name and location you save it?
Once configured, the journal can automatically record in a timeline what files you have worked on day-by-day, showing graphically the name file name and icon under the date it was last accessed.

Other applications of the Journal are keeping logs of meeting request, responses etc.
Interaction between the different areas Of Outlook will produce greater efficiency as well as speed up the daily process.
An example of this, you may receive electronically (email message) the agenda for a possible future meeting. This needs to be communicated to various other parties.
No need to phone around each of the people communicated the date and agenda, a few clicks, an appointment invitation sent, which outlook tracks automatically for the responses.
Configuring the Journal.
To activate the Journal, Click on the Journal icon.

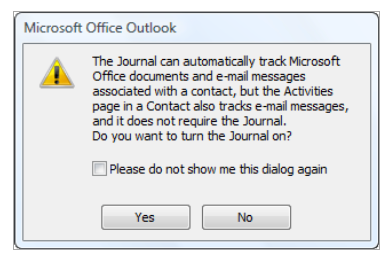
When the Journal is selected for the first time an information box will be displayed.
The information box details the uses of the Journal feature.
To enable the Journal click on the “Yes” button.

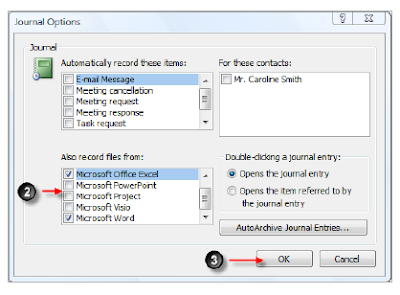
Within the Journal Options select the areas of Outlook that you wish to record.
Press the Ok button to confirm changes.

Modifying the Journal Options.
It is possible to modify the Journal options at anytime.
Tools menu →Options →journal options.

The Journal Options dialog box will be displayed.
Make the required modifications and commit the modifications that you wish the Journal to record.
Entering a Manual Journal Entry.
Another useful feature of the Journal is being able to enter a manual entry. For example you may is to keep a record of when you phoned clients
1. From the File menu → New → Journal Entry.
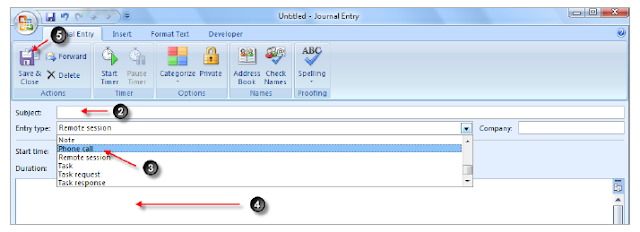
The Untitled Journal Entry dialog box will be displayed.
2. Enter a subject for the Journal entry.
3. Select the Entry Type, in this example “Phone Call”.

4. Enter any additional details for the Journal entry, for example outcomes of the phone call.
5. Select Save & Close to save the Journal entry.

No comments:
Post a Comment