Monday, 2 September 2013

Excel Drop Down lists

There are three different types of drop-down list available in Excel, "Pick from" lists which are generated automatically, Data Validation lists which are very easy to do and, finally, Combo box and List box controls which require a bit more work. 

Pick from lists

As you type a list of data into a column in your worksheet you are automatically prompted with previously entered list elements that match your typed characters. In the illustration, I have typed in an "f" and the cell is filled-in with "fred" as this entry is already in the list.

To accept the prompted text, press ENTER or press the Down Arrow key. To decline the suggestion, keep typing.

ALT Down Arrow displays the list
To generate the list entries without your having to do any initial typing, you can use the shortcut key combination ALT + Down Arrow to display the list elements and then, if you're a keyboard fan, press the Down Arrow key again to go down through the list and then ENTER to accept the entry.

If you can't be bothered with all this good old-fashioned shortcut keys business then just right-click in the cell and choose Pick from Drop-down list in the shortcut menu.

Right-click menu

Data Validation lists

These lists are used where you want to restrict the entry made in a cell to only those items available in a drop-down list. The list of valid entries can be typed in or you can refer to a range of cells which contains your valid entries.  The range of valid entries can be entered into a different worksheet in the same workbook.

Data Validation
Data Validation lists are ideal not only where you need to make sure that people make the right entry but also for data entry generally as it is so easy to choose from a drop-down list. To create the validation list, select the cell or range of cells where you want the list to be displayed and then click the Data Validation control on the Data tab (look for Data Validation in the Data menu if you are using an older version of Excel)

In the Settings tab, choose List from the Allow drop-down list and then type in a comma-separated list of your valid entries into the Source box. Click the OK button and you're done. The list is available when you click on one of the cells where the validation has been applied and data entry in the cell is restricted to only those items in the list. Click the Error Alert tab if you want to change the standard "the value you entered is not valid" error message for invalid entries. You may prefer something a little more personal. 

Using a range of cells to provide the source
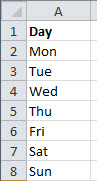
Range of cells
A range of cells is preferable for your data validation where you either have a long list or you want to be able to change the list regularly.

You can set the Source data validation as either a horizontal or vertical range of cells or an entire column or row. Either type in the range reference or (far easier) select the range or click the column letter or row number.

If you click the column letter then remember that any heading at the top of your list on the worksheet will be included as the first item in your validation list. But if you add to the list on the worksheet then these additional items will automatically appear in the validation list. So there are advantages and disadvantages to selecting the whole column.

If you specify a range of cells then then you don't have the headings issue to deal with but if you then add to the list on the worksheet then you will also have to remember to reset the Source data range to include your additions.

Referring to a range on a different worksheet

If you are using Excel 2010 or later then when you set the validation source range as being a range which is entered on a different worksheet, simply click the relevant sheet tab and then select the range. No Problem. Should you have an earlier version of Excel then you have a problem as you won't be able to click any other sheet tabs and even if you type in the range reference with it's sheet reference it will not be accepted! Don't despair, it can be done but it's a wee bit clunky.

Referring to a range on a different worksheet for older versions of Excel

If you have any version of Excel before Excel 2010 then you have to firstly Name the range of cells that you want to use for your validation source data range and then refer to that Named Range when you do the data validation.
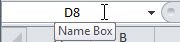
The Name Box
Firstly, select the cells containing your list and give it a suitable name using any naming method that you're familiar with. If you're not sure how to name a range then I would recommend using the Name Box, which is that area on the extreme left-hand side of the formula bar where you normally see your active cell reference.

Name the Range
Type in the name (in this example it is "Months") and then press the ENTER key to register the name correctly. Please don't click out of the box after typing the name, press ENTER! Sorry for being boring but that's where it's so easy to go wrong.

Finally, select the cells where you want to apply your data validation and then refer to the named range in the Source box. It's no good just typing in the range name, you have to make a reference to the range name. In our example, we are using the range "Months" so the reference needs to be entered like this, =Months.

Wrong!
If you leave out the equals sign in front of the name then your data validation list will display as the literal text of the name rather than the range itself.


Displaying the drop-down list in alphabetical order

The drop-down list is linked to the values in the worksheet cells, so sort the list in the cells in alphabetical order if you wish to show the drop-down list in the same order. But you can't have the drop-down list in a different order.

Dependant Data Validation lists

Sometimes you need the choice that you have made in one list to control the list shown in another cell; one of your validation lists is dependant on the other.
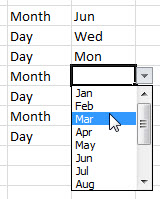
Dependant lists
In the illustration there are two columns, the first column shows the class of date required, "Month" or "Day". This is entered from a simple comma separated validation list which is typed in. The second column needs to show either a list of months if "Month" is entered in the corresponding cell in the first column or a list of days if "Day" is entered.

There are two ranges of cells in the worksheet named as Month and Day respectively which are going to be the alternative source ranges for the second column. When you set the source data range for the second column enter the following formula: =INDIRECT(A2)

Where A2 is the first cell in the first column where you have your "Day" or "Month" entry. Of course, you should change this cell reference to suit your own worksheet. The INDIRECT function is well named as it makes the reference indirect, i.e. not A2 but the range reference entered in A2. In other words, if it's "Day" then show the Day list, if it's "Month" then show the Month list. You're not restricted to just having a choice between two alternative lists, with this method you can have the choice of as many different lists as you like.

If this does not seem to work for you then try checking the following points:
  1. Did you select the area for the dependant range before applying the Data Validation? In the example above it would have been the second column. It's very easy to apply validation to a single cell when you intended to set it for a range.
  2. Check the spelling of the range names (in this case "Day" and "Month") in the first list. They must be correct and you have to remember them as you type them in.

Combo box and List box controls

These are interactive graphics which are drawn on top of the worksheet cells and then linked to certain key worksheet cells. They are commonly employed as a user-friendly graphical device to make user-unfriendly processes involving formulas much easier to control. 
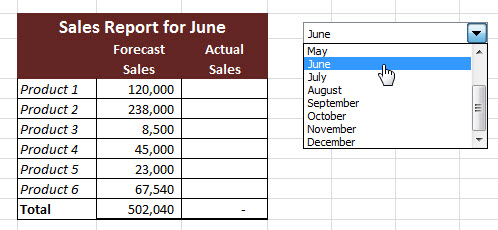
Using a Form control to update worksheet data
In the above example, there is a combo box control containing a list of months. When a month is selected from the list the heading in the worksheet report is updated ("Sales Report for ...") and the relevant monthly numbers are extracted from another worksheet where the full twelve month's figures are stored.

All this is done using Excel formulas but you don't need to know anything about the formulas to use the worksheet, you just choose a month from the list. Combo box controls are quite easy to do, the hard bit is doing all the formulas.

Form controls

There are two sets of graphical controls available in Excel, Form controls and ActiveX controls. They both do much the same job but in rather different ways so it doesn't matter which set you use.

Form controls were designed and built for Excel whereas ActiveX are more general controls which are used in many different applications. Form controls are simple and robust whereas ActiveX controls are more sophisticated and the process of using them takes far longer. It's a judgement call. I shall be using Form controls in this example and deal with ActiveX in a future article.

Finding the Form controls

This is the first job. Form controls are not openly available, you need to reveal them and each version of Excel is different.
  • Excel 2003 and before. Right-click any visible toolbar and choose Form controls from the shortcut menu. Form controls are on the toolbar.
  • Excel 2007. You need to display the Developer tab on the ribbon. Click the Office button and then choose Excel Options. Check Show Developer tab in the ribbon in the Popular section. Form controls are in the Insert control on the Controls group of the Developer tab.
  • Excel 2010 and after. You need to display the Developer tab on the ribbon. Click the File tab and then click Options. Click Customize Ribbon and then click the Developer check box in the Main Tabs list on the right-hand side. Form controls are in the Insert control on the Controls group of the Developer tab. 

Click the Insert control, the Form Controls are the top group. The Combo Box (1) control is the second one in from the left. The List box (2) control is second in from the right. Both controls behave the same; the Combo box is a drop-down list, the List box is an open list.

Creating the Combo Box

You need to go through a few steps to get the Combo box working. Firstly, create some cell ranges where you are going to store the data that you want to have displayed in the drop-down list and a cell to link the Combo box to. When you format your Combo box these ranges are going to be your Input range and your Cell link.

Personally, I would always put these data ranges on a separate worksheet so that I can then hide it. In the example I shall be using Named Ranges, as they are so easy to work with, rather than normal cell references but this is just personal preference. Use Named Ranges or the standard A1-style cell references as you prefer, they both work fine.
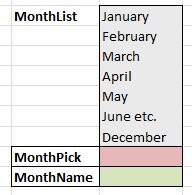
Cell data ranges
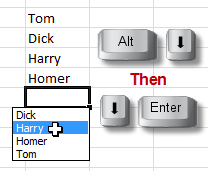
In the illustration, I have a list of my twelve months (shortened for clarity) these are the grey cells and are named MonthList. The red cell is going to be the cell link and is named MonthPick and the green cell is MonthName, where I am going to enter a formula which will calculate the current month. Now it's time to create the Combo box, there's three steps:

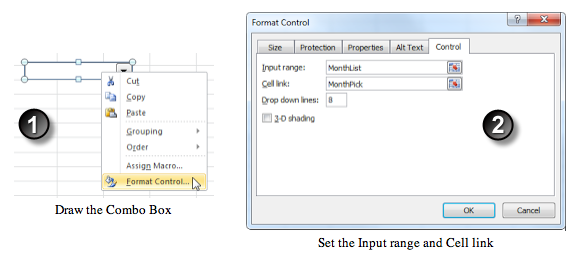
  1. Draw the Combo box. Click the Combo box control and then drag to draw a horizontal rectangular shape. You can resize it later if it's not quite right. Right-click the control to display its shortcut menu. Try to right-click when your mouse pointer is pointing to the middle of the control as there are different shortcut menus available, you want the one that contains Format Control.
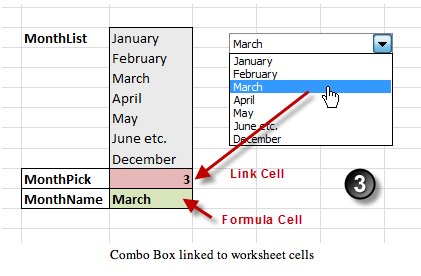
  2. Format the Combo box. In the Format Control dialog enter the Input Range (in this example MonthList) and the Cell link (MonthPick) Click OK.
  3. Test the Combo box. Click a worksheet cell to take the focus away from the Combo box. It's now active. Click the drop-down arrow and choose an item from the list. You should see that a value is returned into your link cell. It's an index value, it's not the text from the list. If you choose "March" from the list then the index is the value of 3 because it's the third item in the list.
That's the Combo box control completed and now it's time to enter our formulas in the worksheet to make everything happen.


Entering the formulas

When you choose a month from the list you want to trigger the following processes in your formulas:
  1. Update the month name definition. This formula goes in the cell named MonthName so that we can use the name in our formulas wherever we need the selected month declared.
  2. Update the report heading with the name of the month.
  3. Update the report by showing the relevant data for the selected month.

Formula in the MonthName cell
Use the index value MonthPick to return the relevant item from the MonthList list using Excel's INDEX function. The formula is:

=INDEX(MonthList,MonthPick)

Update the report heading with the name of the month
The named range MonthName updates to show the currently selected month so we concatenate it's value with the static text "Sales Report for ...". The formula is:

="Sales Report for "&MonthName

Update the Sales Forecast figures to show the currently selected month
There's various ways of doing this but the most obvious way is to use the index value MonthPick in a Lookup formula to return the current month's figures from the range containing all the year's Sales Forecast figures.
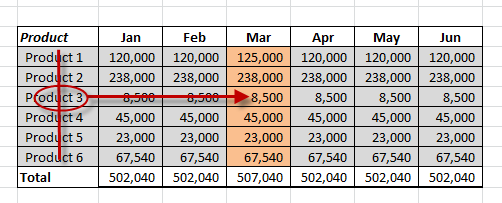
Looking up the monthly figures with VLOOKUP

In the illustration, the grey cells are named SalesForecast. If the selected month was "March" then the value of MonthPick would be 3. The corresponding "March" figures are in the 4th column of the table so if we add the value of 1 to MonthPick then we can calculate the correct column index for our lookup formula. The formula is:

=VLOOKUP(B5, SalesForecast, MonthPick+1, FALSE)

Where B5 is the cell reference of the first Product in the main report, SalesForecast is the lookup range, MonthPick+1 the column index value and FALSE because it is an Exact Match VLOOKUP based on matching the product name in the main report to the products listed in the first column of the lookup range.

You might find it a bit clearer if you examine a working copy of the Excel workbook:
Download Excel workbook

Related Posts
Excel-Calculations without formulas
Excel-Sorting by last name
Excel-Switching columns to rows
Excel-Calculating age from date of birth

Training Courses

If you've still got that "I just don't know what I'm doing" feeling then you might like to arrange an Excel training course for yourself or with some of your colleagues. It's really easy to book one of our courses and they're great value for money. See our website for full details.

Wednesday, 21 August 2013

Excel AutoSum Revisited

You just can't get away from AutoSum. If I had a pound for every time I've clicked AutoSum to add up a column of numbers I would probably be sitting on a tropical island somewhere still clicking it to add up all my vast wealth. It's one of the first things you learn about in Excel and, of course, everybody knows it inside out.

Select the cells
Here's a really easy way of calculating column and row totals without having to do all that infernal copying.

First job is to select all the cells containing your numbers and extend the selection to the empty cells where you want the totals.

Click AutoSum
Then you click AutoSum and you're done! It really is that easy. If you only want the column totals then just select the cells with the numbers and the totals are returned into the row below.
Column and Row totals
Here's all the column and row totals done in two simple steps. And they are done perfectly as the range references in the SUMs are implied by the selection. They hardly need to be checked.


AutoSum shortcut
If you prefer to do the whole thing with your keyboard then hold down the SHIFT key and extend the cell selection by pressing the arrow keys. Then use the shortcut key combination ALT= to generate the SUM formulas.


Grand Totals

But it's not just one table is it, you've got loads of them and some serious number crunching to do. You can extend the select-and-click-AutoSum method to do grand totals as well. But, be careful, this method only really works if every line item in your worksheet is drawn into a subtotal.

The Selection for AutoSum Grand Totals
Firstly, calculate all of your individual subtotals and then make a selection of all of the cells containing your numbers and the cells containing your subtotals.

Now, click AutoSum and all the cells containing your subtotal SUMs are detected and the Grand Total is calculated correctly without any risk of double-counting.

Ranges and Unions

Here's the resulting formulas displayed in the cells and you clearly see the formulas containing the original range references for the subtotal SUMs.

The grand total SUMs are unions, showing each subtotal reference separated by commas.

Checking your Formulas

Show the Formulas
As some of us know from bitter experience it is very embarrassing when a simple mistake in your formulas messes up all your careful calculations. It's always a good policy to check that you've got your formulas right but it's a bit painful to view them in the formula bar. 

Formulas displayed in the cells
Display the formulas directly in the cells by clicking the Show Formulas control. It's in the Formula Auditing group of the Formulas tab. Click once to show the formulas and click again to show the results.

Show Formulas shortcut
If you have an older version of Excel then you have to search in the Tools, Options dialog for this option which is not much fun and I recommend that you use the shortcut key combination CTRL ` (that's usually the key under the ESC key on the top right of your keyboard}

Happy number crunching.

Related Posts

Excel-Calculations without formulas
Excel-Sorting by last name
Excel-Switching columns to rows
Excel-Calculating age from date of birth

Training Courses

If you've still got that "I just don't know what I'm doing" feeling then you might like to arrange an Excel training course for yourself or with some of your colleagues. It's really easy to book one of our courses and they're great value for money. See our website for full details.

Tuesday, 20 August 2013

Word Typing-in Accented Characters

Accented Characters

Hold down the ALT key on the left hand side of the keyboard while you type in the four digit code using the numeric key pad on the right hand side of the keyboard. The character is displayed when you release the ALT key.

Activate the numeric key pad by pressing the NUM LOCK key before typing the code. Do not use the number keys at the top of the keyboard as they do not generate the correct codes. Always remember to enter the full four digit code including the leading zero.


Cedilla and Ligatures


Friday, 16 August 2013

PowerPoint Removing Backgrounds from Pictures

Removing Backgrounds from Pictures

Extracting the main subject from the background of a picture or photograph used to be a marathon task (for me!) involving Photoshop masks and paths or background erasers but with Microsoft PowerPoint 2010 and later you can do it directly in process using the Remove Background control.

Elvis on car
You won't get quite the sophistication or fine control of the Photoshop process but for simple images the edge detection is really good and it only takes a few minutes. 

This is perfect for simple image manipulation, like removing the white background from a company logo.

Here's a photograph of our mascot, Elvis, sitting on the bonnet of a car. He loves doing this while the engine's still warm. But I didn't want him on the car, I wanted him on a slide. PowerPoint will do this in 5 minutes, in real life there's no way that cat's moving. The first job is to insert the photograph onto your slide as you usually do and keep it selected.

Next, find the Remove Background control, it's on the extreme left-hand side of the Picture Tools tab. Give it a click and see what it comes up with.

You usually find that the initial results are quite impressive and after a wee bit of tweaking you've got an excellent extraction.

First go. Not bad!
As you can see with this one most of it's good but part of the car has been retained and Elvis has lost his stripey tail.

There's a bounding box around the captured subject image and all the areas of the photograph that are to be removed are coloured mauve.

Now for the tweaking. We're going to adjust the bounding box to include the tail and then zoom in on the other areas and use the controls on the ribbon to specify which parts we need to keep or remove.

Adjusting the bounding box


I've dragged the left edge of the box to the left and Elvis gets his tail back. Great. I've dragged the bottom edge of the box down and Elvis gets his front paw back but I've gone too far down and included his reflection on the car.

Keep going with the box until you get as close as you can to your desired image. Now it's time to zoom in and deal with all the fine work by using the keep and remove controls on the ribbon.

Zoom in or out of your image either by using the Zoom control at the lower right-hand corner of the PowerPoint window or by holding down the CTRL key as you spin your mouse wheel forward or back.
Controls on the Ribbon


When you use the Mark Areas to Keep and Mark Areas to Remove controls don't bother trying to draw a line around the areas to keep or remove, instead draw a line straight across them and let the edge detection do the work for you.

Using the Remove control
Draw a line with the pencil pointer straight across the offending areas.


Zoomed in for fine work
Here we can see the results, after a few swift strokes most of the car has been removed and if I had more patience then I would have continued going around Elvis and tidying up his fur but I wasn't bothered as it's a fairly low-res photograph and the intended slide image is quite small.

It's time to click the Keep Changes control and let the cat out of the bag.

I've often wondered why that cat is called Elvis.


The Thoughts of Chairman Elvis
And finally, here's the old fella on his slide ready to wow his audience by telling them all about the really important things in any cat's life.

I've changed the background image and I've flipped and rotated Elvis. He won't like that at all.

"Where's my dinner?" "Miaow!!!" I think it's time I left the building. Best of luck with your slides.


Related Posts

Excel-Calculations without formulas
Excel-Sorting by last name
Excel-Switching columns to rows
Excel-Calculating age from date of birth

Training Courses

If you've still got that "I just don't know what I'm doing" feeling then you might like to arrange a PowerPoint training course for yourself or with some of your colleagues. It's really easy to book one of our courses and they're great value for money. See our website for full details.

PowerPoint Text Boxes

Formatting Text in Text Boxes

When you format the text inside a text box your formatting is only applied to the word with the focus and all too often you have to drag across your text to select it and, if you're a bit clumsy, you end up moving the text box.

No need. Just click the outside edge of the text box or, even easier, press the ESC key. Now the entire text box is your current selection and your formatting is applied to all of the text in the text box.

Only click on the text in the text box when you want to format a single word or a particular phrase.


White Space in Text Boxes

You don't want every element of text in your presentation to be a bullet point, sometimes it is more natural to use a series of short paragraphs. But when you press ENTER to start a new paragraph the space between the paragraphs is full height because it's based on the font size you are using. 

Paragraphs with full height spacing
Text usually looks better if you reduce the amount of white space between your paragraphs to around half or two-thirds of the height of the font. Say you're using an 32pt font, then you should consider reducing the space to around 18pt or so.

This is a good one to know for Word as well, instead of banging away with ENTER, ENTER after each paragraph; adjust your paragraph's Space After setting to a suitable amount and then press ENTER once to start a new paragraph. ENTER, ENTER is typewriter formatting.

Anyway, let's stay with PowerPoint. To make the setting you either click the Line Spacing control in the Paragraph group on the Home tab and then look for Line Spacing Options or (far easier) click the launcher at the lower right corner of the Paragraph group.

Dialog launcher on the Paragraph group
Take a quick look at the font size you are using and then enter a suitable value into the After box of the Spacing section. This needs a quick bit of mental arithmetic but it's only working out halves or two-thirds and there's no need to be precise.

The space between your paragraphs is now huge because you have your new space after plus the original full height paragraph. Just click after the first paragraph and press DELETE to remove the empty paragraph and leave you with your beautiful, balanced paragraph spacing. 

Paragraphs with balanced spacing
Space After
Space After values can be either typed in or you can use the spinner control.

The effect of the reduced spacing is subtle but it looks so much better than before and that's the type of thing that makes a big difference when your slide is projected on the big screen.

White Space around Bullets

You can also use paragraph formatting to adjust the amount of white space around any bullet points on your slide. This is done using the Indentation settings available when you click the Dialog box launcher at the lower right corner of the Paragraph group.

Paragraph Indentation for Bullet Points
The Before text value sets the amount of white space between the left edge of the text box and the bullet. The Hanging value is the space between the bullet and the text.

Standard bullets with tight spacing
Bullets with looser spacing

Related Posts

PowerPoint-Removing Backgrounds from Pictures

Training Courses

If you've still got that "I just don't know what I'm doing" feeling then you might like to arrange a PowerPoint training course for yourself or with some of your colleagues. It's really easy to book one of our courses and they're great value for money. See our website for full details.

Wednesday, 17 July 2013

Microsoft Windows 8.1 Preview

Windows 8 Background

Windows 8 was released in August 2012 as a radical redesign of the previous Microsoft Windows desktop. It featured an attempt to design an operating system which would be suitable both for the traditional keyboard and mouse set-up and for the more contemporary touch screen (or tablet) devices, such as Microsoft Surface.

The applications created specifically for Windows 8 were implemented using a visual design language called Metro which has subsequently been renamed as Modern. Metro/Modern emphasises the use of very clean, clear typography.

The original design proved to be rather too radical an update for many long-time Windows users, some of whom struggled to perform basic tasks such as starting up an application or finding a recently used file. Windows 8.1 is the update that aims to make the transition from Windows 7 less drastic.

A Taste of Windows 8

My first experience of Windows 8 was typical. I went to visit a customer to deliver an Excel training course. Their IT guy took me under his wing and showed me his beautiful, brand new desktop computers kitted out with touch screens and loaded up with the latest version of Windows.

Hardly able to contain my excitement, I said "Let's start up Excel". A simple task you would think and after a good 10 minutes we had managed to get one machine running Excel. After 20 minutes we had all six going. Of course, this usually takes about 2 minutes.

At the end of the day, my IT guy reappeared and we decided the shut down all of the computers. This proved a little harder than we expected. In fact, we failed. So, being practical guys, we pulled out the power leads. Our excuse was that neither of us had encountered Windows 8 before. I was fascinated to see what Microsoft had made of Windows 8 since.

This review is based on the preview version; there may be significant changes before Windows 8.1 is released later in the year. I mainly used Windows 8.1 with a standard keyboard and mouse laptop but spent a few happy hours with a Lenovo ThinkPad to check out how it behaved with a touch screen.

Start Screen

Once you've signed in you come to the Start screen. This is the famous "dashboard for your world" and you can click any of the tiles to launch a Modern App. If you just want to get some work done then click the Desktop tile (at the lower left hand side) and use the Start button. If you're used to using Windows 8 the small swipe used to select a tile has changed. That now swipes you down to the Apps screen instead. To select a tile, press and hold on it.

Start Screen, the Desktop tile is lower left
The Start screen can be viewed as a replacement for the old Start menu. You can easily create a shortcut for a desktop application and it will launch on the desktop.

Any of the existing tiles can be removed or replaced and you can "pin" any tiles on your Start screen. But if you want to launch an application without creating a shortcut then you go to your Apps screen. On Windows 8 you had to swipe across to see your Apps but now you swipe down.


Display Apps
To go to your Apps screen using your mouse click the downward pointing arrow which is available at the lower left hand side of the screen below the tiles. It becomes visible when you hover your mouse in that area of the screen.


The Apps Screen
The view of the Apps screen shows the Modern Apps listed first and you either swipe or scroll across to see your Office Apps.

You can change this order to show the Office Apps first but whilst a swipe on a small screen is a minor matter it is a painful process with a mouse on a large monitor.

Firstly, you have to point down to the bottom of the screen, find a scroll bar which only becomes active when you hover over with your mouse and then scroll.

Scroll across for Office Apps

Windows 8.1 has a pretty face; it is graphically very attractive but the gloss is starting to come off the product, this is the first of several instances where you feel that this interface was not designed for traditional mouse users.

Of course, what you should do is change the sort order of your Apps. By default they are listed "by name", you just change the order to "by most used" and then you will probably not need to create any shortcuts.


Arranging Windows on the Desktop

One of the major criticisms of Windows 8 was that it was difficult to arrange the different application windows and that you could only have two apps visible at the same time. Relax, this only ever applied to Modern apps on the Start screen, not for apps on the desktop.

Many people need to copy and paste from one window to another and this was never a problem with Windows 8 nor is it an issue with Windows 8.1. Standard apps run on the desktop and you can arrange them as you always have without difficulty. After all, it is called "Windows".

The familiar Desktop

Start Button
The Windows 8.1 desktop is as familiar and as easy to use as any earlier version of Windows.

The original Windows 8 dispensed with the Start button which confused many people as they found that while it was easy to start one application it was not so obvious how to do another. The Start button has now been restored. The original Start menu has not, click the Start button and you go to the Apps screen.

Standard application windows on the Desktop

In Windows 8 it was possible to have two Modern apps on screen at once but one of them had to occupy a thin strip at the side.

This has been changed and you can now have two apps with half of the screen each and you can drag the divider line between them to give one app more space if required.

Depending on the resolution and size of your screen, you may be able to have up to four modern apps next to each other.

Search

Search is much improved. The Windows 8 the system-wide search defaulted to searching for Apps only and threw you out onto the Start screen. You had to click on other categories such as Files or Settings if you were not actually searching for an app.

Search-just start typing!
Search now searches everywhere, including the internet. The Search pane is displayed on top of what you're currently doing.

Clicking any of the returned results will launch the relevant Modern UI app, desktop app or web browser.

But far and away the best bit about Search in Windows 8.1 is the bit you can't see. Search is so easy it hurts. You don't actually have to use any particular control in the interface to search.

You just type something in! Yes, look at the screen, type your search text, the Search pane opens and your search results will instantly be displayed. Brilliant!

We discovered this quite by chance when we were having a Windows 8 moment. Where was File Manager and Control Panel? We typed in "Control Panel" and soon found out. However, it must be said that at the time we had yet to discover our Charms.

Charms

Point your mouse to the relevant hot spots on the screen, that's the top or bottom right hand corners and your "Charms bar" will appear. But don't admire your Charms for too long because they will soon disappear unless you point your mouse towards them to make them active.

The Charms bar-over to the right
The Charms bar includes Search, Share-options for sharing what's currently on your screen, like a web page that you want to email, a Start Button, Devices-devices currently connected such as a printer or a phone and Settings for the majority of options previously available in Control Panel.

The expanded Change PC Settings in Settings gives the complex mass of Control Panel options a nice, clean, straightforward user interface that Windows has needed for years.

Another hidden gem in Settings is the Power icon. One of the most common user complaints about Windows 8 was that while it was fairly obvious how to get to the Start screen and reasonably obvious how to start an application hardly anybody could work out how to turn their system off.

That's how you shut down!
"How do you turn it off?" was the refrain. There are several ways of shutting down, none of them obvious but the easiest, if you know about your Charms, is to go to Settings and click the Power icon then choose Shut Down from the pop-up menu.

It's quite a good idea to learn your Windows shortcut keys if you are going to use Windows 8.1 without a touch screen.

You need your Windows key to switch between the desktop, where you do most of your work, and the Start screen and Apps screen. For example, to get to your File Explorer it's Windows key and you should see "File Explorer" listed on the Apps screen.

The other essentials are:

Charms bar is Windows key + C,
Settings is Windows key + I,
Lock Screen is Windows key + L.

See a comprehensive list of Windows 8 shortcut keys.


Lock Screen

If you sign out or take a coffee break you will return to your Lock screen and have to sign in again with your password. Pretty standard stuff and just what you want. 

The Lock Screen
The Lock screen can be set to turn into a photo gallery, picking photos automatically. So, it's maybe not a good idea to have inappropriate photos tucked away in a folder somewhere.

For tablet computers, you can unlock the camera or answer a Skype call without needing to fiddle with a password.

And it's goodbye to the good old fashioned three finger salute, CTRL+ALT+DEL. It's still supported but no longer needed. To go to the Lock screen deliberately it's Windows key + L.

Should you press CTRL+ALT+DEL out of habit then you need an extra click to choose Lock.

To get past the Lock screen, you swipe up, click your mouse or press a key on the keyboard. Our cat, Elvis showed us how to do this. Every time he sees a shiny screen or a glass window he swipes it with his front paws.

Customisation

If you are using Windows 8.1 on a non-touch system and predominantly use the desktop then a few changes will make a world of difference. There is a new tab, "Navigation", available when you right-click the desktop Taskbar and choose Properties. Here are the options which resolve most of the worse complaints which bedevilled Windows 8.

Three simple changes should make your day:
  1. Start up straight to the desktop and bypass the Start screen.
  2. Show desktop apps before Modern UI apps on the Apps list when sorted by category.
  3. Force the Start screen to show on your main display if you have more than one monitor.

The Case For

  1. Windows 8.1 is not the great leap as Windows 7 to Windows 8 was.
  2. Using Windows 8.1 on a traditional desktop PC only requires a few hours familiarisation, a few tweaks and a bit of patience. And away you go.
  3. Windows 8.1 is a fast, stable OS and that is for the pre-release version.
  4. It's pretty, you do have to look at it all day long.

The Case Against

  1. Windows 8.1 is still an operating system of two halves. If it is to take over the mantle of Windows 7 then it needs to cater to the target market, which is people using Windows at work on a laptop or PC without a touchscreen and using the desktop for the majority of the time. This is likely to be the case for the foreseeable future
  2. These people are working and need to be productive, they probably do not want to jump around between a desktop and a glorified smart phone interface nor do they want to fiddle with settings.
  3. All too often Windows 8.1 breaks the cardinal rule of good user interface design, Don't make me think. Until you are familiar with the new interface some simple tasks will seem to be overly complicated.

The Verdict

Windows 8.1 is good for touch devices but not so much for the traditional mouse, screen and keyboard set-up. It can not be described as unusable as some commentators claim, you can work around its foibles easily.

In the software training business we have seen the take-up of Windows User courses go down every year as nobody needs to be trained in the art of the obvious; new Windows 8.1 users may need a little familiarisation.

The comparison with other, more mature, products is inevitable. Apple iPhone and iPad are universally popular touch devices and with good reason; both work superbly well running iOS. Apple iMac does very well on OSX and you do not put down your iPad, turn to your Mac and starting prodding and pinching the screen. You adapt easily to the different standards.

Touch is useless for a large monitor; large touch screens are physically difficult to use as you have to sit closer and you end up with squinty eyes and tired arms. And God help nature's keyboard pounders using an on-screen keyboard; they'll end up whacking themselves in the nose. Attempting to blend together a tablet user interface with a desktop interface seems to be an unnecessary contrivance. Surely, touch for the big screen is merely a change of input device, maybe Magic Mouse or Trackpad!

So, is Windows 8.1 a triumph or a turkey? It's neither; it's not a turkey as it is quite usable once you get used to it and a significant improvement on the original Windows 8. Nor is it a triumph, more of a work in progress. A bold attempt to integrate touch with the traditional user interface that's maybe not quite as slick as you would like it to be.

List of Windows 8 shortcut keys.

Tuesday, 16 July 2013

Windows 8 Shortcut Keys

You'll definitely be needing your Windows key:

Windows 8 Shortcut Keys


Shortcut Key

Action

Windows + D

Show Desktop

Windows + C

Open Charms Menu

Windows + F

Charms Menu - Search

Windows + H

Charms Menu - Share

Windows + K

Charms Menu - Devices

Windows + I

Charms Menu - Settings

Windows + Q

Search for installed Apps

Windows + W

Search Settings

Windows + Tab

Cycle through Modern Apps

Windows + Shift + Tab

Cycle through in reverse

Windows + .

Snaps an App to the right

Windows + Shift + .

Snaps an App to the left

Windows + ,

Temporarily View Desktop

Alt + F4

Quit Modern Apps

Ctrl + F4

Quit normal Apps

Windows + E

Launch Windows Explorer Window

Windows + L

Lock PC, show Lock screen

Windows + T

Cycle through icons task bar on task bar

Windows + X

Show Advanced Settings Menu

Windows + Page Down

Move Start Screen to right monitor

Windows + Page Up

Move Start Screen to left monitor

Windows + M

Minimise All Windows

Windows + Shift + M

Restore All Windows

Windows + R

Open the Run dialog

Windows + Up Arrow

Maximise the current Window

Windows + Down Arrow

Minimise the current Window

Windows + Left Arrow

Maximise current Window to left

Windows + Right Arrow

Maximise current Window to right

Ctrl + Shift + Escape

Open the Task Manager

Windows + Print Screen

Print Screen and saves to Pictures folder

Windows + Pause Break

Display System Properties

Shift + Delete

Delete a file permanently

Windows + F1

Open Windows Help

Windows + V

Cycle through notifications

Windows + Shift + V

Cycle in reverse 

Windows + 0 to 9

Start App pinned at that position

Windows + Shift + 0 to 9

New instance of pinned App

Alt + Enter

Display Properties of current selection

Alt + Up Arrow

View parent folder 

Alt + Right Arrow

View Next folder 

Alt + Left Arrow

View Previous folder 

Windows + P

Choose secondary display modes

Windows + U

Open Ease of Access Center

Alt + Print Screen

Print Screen of Window with the focus

Windows + Spacebar

Switch input language

Windows + Shift + Spacebar

Switch back to previous language

Windows + Enter

Open Narrator

Windows + +

Zoom In using the Magnifier

Windows + -

Zoom Out using the Magnifier

Windows + Escape

Exit the Magnifier